Installment XI in the Mako rebuild project.TJ and I have reached a major turning point - so far it's all been destruction to this old Mako. Now we're ready to build! After a fair amount of elbow grease cutting, grinding and chiseling out the old rotten core from the transom, we'll begin preparations to bond in new core.

Step one - we need a template for the new core. A large cardboard box worked well for this. Matching the exact core shape is a challenge since we destroyed the old core. We approximated the shape by first clamping the cardboard sheet lightly to the outside of the transom. We traced the exterior contours for a rough, oversized shape, too big to fit inside. Then we pared away excess to fit the inside the boat. An easier approach would be to drape a simple cloth over the inside and trace it with a
sharpie, but we used what we had. Matching every intricate imperfection would be extremely tedious. We didn't sweat the details too much, any voids will be filled with thickened epoxy. We will ultimately bed our core into place with thickened epoxy, like a brick in mortar.
With a satisfactory fit of the template, we traced the shape to new core. We selected a sheet of
3/4" Penske board. Penske, properly known as
Airex PXc board, is high density urethane with glass fibers mixed in for reinforcement.

A sheet of Penske is structurally strong, shapes easily and is impervious to water. Unlike traditional plywood, this core will never rot! We managed two transom cutouts onto one 4'x8' sheet. Sandwiched together it will give us a total core thickness of 1.5 inch. To scribe the cut, we used a
Festool Jigsaw. The jigsaw style seen in the picture is the barrel grip. I prefer this style to the traditional top handle for lightness and scribing blind underside cuts.

We dry fit our core cutouts to the transom. A little grinding was required on high spots. We also trimmed the top to approximate the old core height - slightly less than the outside skin.

Now, I'd like to say removing the old core came off without a hitch- but I can't. We punched through the outside a time or two in the process and those need some touching up. A
proper patch would suffice, but we opted to bullet proof the transom with one layer of
biaxial cloth. This will go in place just before the core installation. Biax, also called
1708, is great stuff for structure applications. But before you go ahead and jump on the biax train too, you may want to read on in future post to see how it worked with epoxy. These pictures show our cut of the cloth.

We used these
electric shears to cut the cloth and man they're awesome. One of those simple things that makes life so much easier. A little battery powered gadget that sounds like an electric toothbrush. You can lay the cloth over a shape and cut it out without manipulating it and distorting the weave. If you have alot of cloth cutting to do, it's worth it's weight ten times over for the savings on damaged cloth!

The old Mako made a trip for the the next phase. We were blessed with access to a heated building in winter! The unheated warehouse posed a problem for resins to cure. Cold temps can be overcome by very fast hardeners in a pinch, but it's a give and take. Very fast hardener will accelerate cure in cold temperatures, but epoxy cures much stronger in temperatures above 60 degrees (the warmer the better). The
cure strength is much happier in a warm workshop. Come summertime mother nature will take care of the heat for us, but for now this workshop is a blessing.

Before calling it quits for the night we did a few last odds and ends. We tried out the biax cloth for fit and made some diagonal slices to fit it into the odd corners. Next we etched the whole bonding area with a wire brush and course sandpaper to add a little tooth for bonding. We then cleaned the inside thoroughly with the shopvac. Placed a few bandaids with
painters tape to show our sympathy for the wounds we had inflicted, then we filled all those old screw holes and damaged spots with thickened epoxy. Content with how things looked, we retired to our favorite pastime - standing back for a gam session with a beer in hand, talking about "what we should really do next is..."


 In this next step we will wet out and layup one layer of biaxial cloth inside the transom before bonding in new transom core. Our thinking - the 1708 biaxial will bolster strength and makeup for any minor deficiencies in the old transom skin.
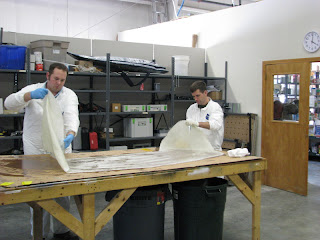
 We mixed up several batches of West System neat epoxy (no additives) and wet out the 1708 cloth on the table. There is a science to estimating the amount of epoxy needed to wet out cloth. We don't make any pretenses to be scientists; our formula= mix many small batches til we don't need anymore. We gently squeegeed it over the surface with a single edge spreader and let the cloth soak in the epoxy. Typically the cloth will become translucent as fibers soaks up and bond to the resin. This did not hold true for the biax, but more on that later.
 Transfering the wet-out cloth to the transom is most certainly a messy two person procedure. An alternate method is to bring dry cloth over and wet it in place.
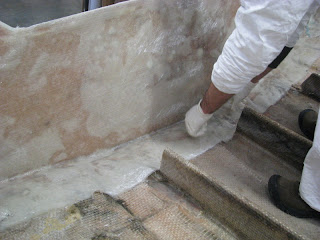
 Once aligned, we chased out all air from under the cloth using laminating rollers and spreaders.
 Notice the Biaxial cloth does not wet out completely clear. In hindsight we learned that styrenes in this "mat type" fiberglass cloth do not bond with epoxy as they do with polyester resin. (Biaxial is woven cloth one side and mat on other side.) Engineers at West System acknowledge this quirk between mat type fiberglass and epoxy in their literature. They also state it does not negatively impact the finished composite strength (from extensive testing). Yet any mat based fiberglass wetted out with epoxy will be less conformable (i.e. harder to drape over a shape) than the same mat cloth using polyester resin. Wow, who knew? Certainly not these two guys. Also, if this were a critical application where it needed to be clear, biax and epoxy should not be your mix of choice (i.e. a cold molded hull where beautiful mahogany shows clear through). Lucky for us, biax and epoxy are fine in this hidden and flat application. Henceforth though, I think we'll stick to regular 4 to 8 oz cloth compatible with epoxy.

 The transom area received one last go over with
  We layered on several pairs of gloves so we could peel off a layer without interupting workflow as the epoxy becomes tacky and tools stick. We then used
 We mixed several small batches to complete this step. Large batches hold heat from the resin/hardener exotherm and will surely kick before you can apply it all. Should the epoxy "kick" in the pot, you'll feel the heat building in the mixing pot, and the epoxy balls up like chunky cookie dough as you spread it - not good. To forestall the heat buildup we could chill the resin beforehand or disperse the mixed epoxy in a flat pan, but it's easier- with less waste- just to mix in smaller portions.


